The systems in the computer modeling laboratory, as well as Tennessee Tech University’s HPC cluster, run versions of the Linux operating system. Linux is a family of open-source, UNIX-like operating systems that are based on the Linux kernel. UNIX is a family of multi-tasking, multi-user operating systems that run on most of the internet servers and scientific computing clusters in the world today. The most popular commercially-available UNIX operating system today is Mac OS X. Many smartphones and tablets, including the iPhone, iPad and Android devices, are running a UNIX-based operating system as well.
The development of UNIX pre-dates Windows by at least a decade, going back to the original AT&T UNIX developed at Bell Labs in 1970. AT&T licensed UNIX to outside parties in the late 1970s, which led to a variety of academic and commercial variants — University of California at Berkeley (BSD UNIX), Microsoft (Xenix), Sun Microsystems (SunOS/Solaris), HP UNIX (HP-UX), and IBM (AIX). Today’s Mac OS X is based off of the NeXTSTEP/OPENSTEP UNIX variant, which is a derivative of BSD UNIX. UNIX systems are commonly characterized by their modular design which is often referred to as the, “UNIX philosophy.” This idea is that the operating system should provide a set of simple tools which individually perform a limited, well-defined function. Scientists in 1970 never envisioned that computers would one day occupy a desktop (or even someone’s pocket, for that matter), so it was essential that a multi-user operating system be developed with a unified filesystem and inter-process communication. A system of shell-scripting and command language, known as the UNIX shell, was developed to provide tools for complicated workflows.
Linux was developed separately in the late 1979s by Finnish-American software engineer, Linus Torvalds, with the first Linux kernel becoming available on September 17, 1991. It was originally developed for personal computers based on the Intel x86 architecture. Many Linux distributions and supporting software and libraries are provided under an open source license through the GNU Project. Due to the open source nature of Linux, the operating system has become popular among the scientific computing community and is the primary operating system used by the majority of high performance computing (HPC) clusters and supercomputers.
Most modern MacOS X and Linux workstations today come with a graphical user interface (GUI) to simplify the use of the computer as much as possible. To take full advantage of the scripting capabilities for automating tasks and analyzing complicated scientific data, some knowledge of the command prompt is necessary. Most of the commands are very short and simple, such as ‘ls‘ for obtaining a listing of files in your directory, ‘cd‘ for changing directories, or ‘rm‘ for removing files. For novice users, it might be helpful to download the following “cheat sheets”, containing many commonly used UNIX commands:
Many Chemistry students learn how to use ChemDraw to sketch a 2D molecule on the screen during their undergraduate or graduate education. ChemDraw is the de facto standard for producing chemical drawings, and is widely used by faculty and researchers for publications. The process is fairly straightforward, and allows the user to quickly see the primary chemical features and functional groups of a molecule. But what do you do when you wish to convert that molecule to 3D, such as if you want to run quantum mechanical calculations of the structure, perform molecular docking, or even to convert the molecule as an STL file to output to a 3D printer? You could certainly build the molecule using the tools available in 3D molecular modeling software such as Avogadro or MOE 2020. This works well for small organic molecules, but can be time-consuming if you have a fairly large molecule, or several molecules already sketched out in ChemDraw and you want to import them quickly. Another issue could be in handling the complicated valence issues of the metals and transition metals, since most molecular modeling software does not have parameters for these atoms easily accessible in the interface.
This tutorial covers the steps for converting a 2D sketch of a molecular in ChemDraw to the 3D format used by molecular modeling software (Avogadro and MOE 2020) by converting the molecule to an ASCII text string called SMILES. SMILES is an acronym that stands for Simplified Molecular-Input Line-Entry System. SMILES was developed by David Weininger at the US EPA Mid-Continent Ecology Division Laboratory in Duluth, Minnesota, in the 1980s, working in collaboration with Albert Leo and Corwin Hansch at Pomona College and Jeremy Scofield at Cedar River Software. In 2006, IUPAC developed a similar single-line code called InChl, though most software supports SMILES because it is considered easier to use and it is open source.
The general idea behind SMILES is to convert a 2D or 3D version of a molecule to a single line of text, so that this single line could be stored in a computer database for use in similarity searching and other calculations and be easily retrievable by software programs. In SMILES code, atoms are represented by their chemical symbols from the periodic table placed in square brackets (commonly used organic elements – B, C, N, O, P, S, F, Cl, Br, or I – do not have to be in square brackets). Bonds are represented using symbols – ‘.’, ‘-‘, ‘=’, ‘#’, ‘$’, ‘;’, ‘/’, or ‘\’ (single bonds may also omit the dash). Hydrogens are usually omitted unless they are on an atom with a positive or negative charge. So ethanol may be represented in SMILES code as ‘C-C-O’, or it may be represented as ‘CCO’ if you omit the dash for single bonds between heavy atoms. Ring structures may be written in SMILES code by breaking the ring at an arbitrary point and adding numerical ring closure labels to show connectivity. For example, cyclohexane would be represented in SMILES code as ‘C1CCCCC1’.
To see how this is generated for some molecules, open ChemDraw (if you are a student on your own computer, use the VMWare Horizon Client to connect to the Chemistry Learning Commons to open ChemDraw.
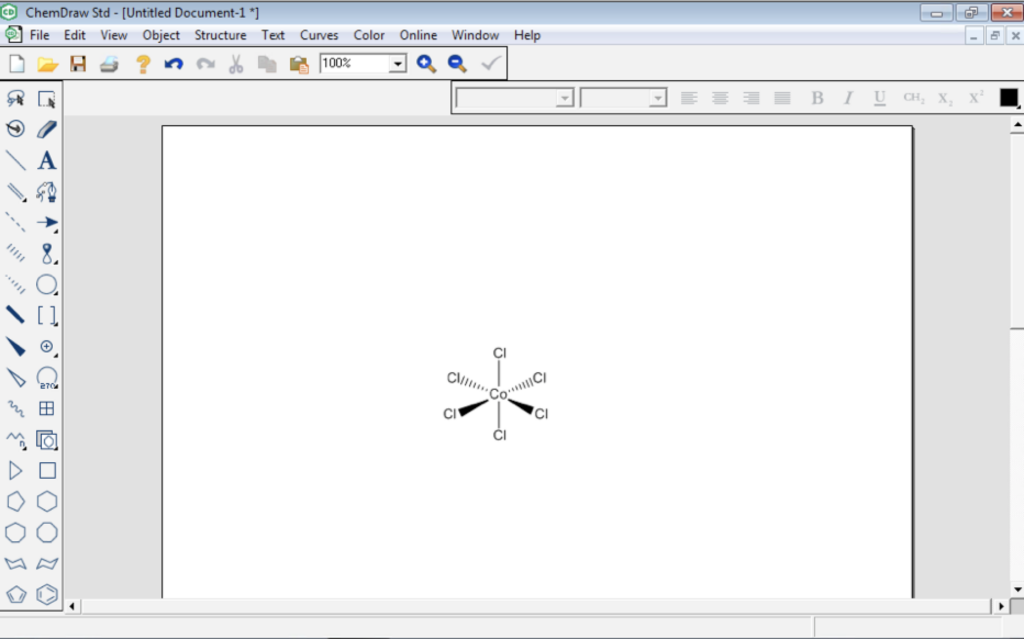
Let’s say that I want to model Cobalt(II)hexachloride as a 3D molecule in MOE 2020. Start by sketching this using wedges-and-dashes as shown.
Sketch of Cobalt hexachloride in ChemDraw.
Next, put a box around the molecule and right-click on the box. Go to the MOLECULE > COPY AS > SMILES. This copies the SMILES string to your clipboard, and you can paste it into a text editor by pressing CTRL-V:
Cl[Co](Cl)(Cl)(Cl)(Cl)Cl
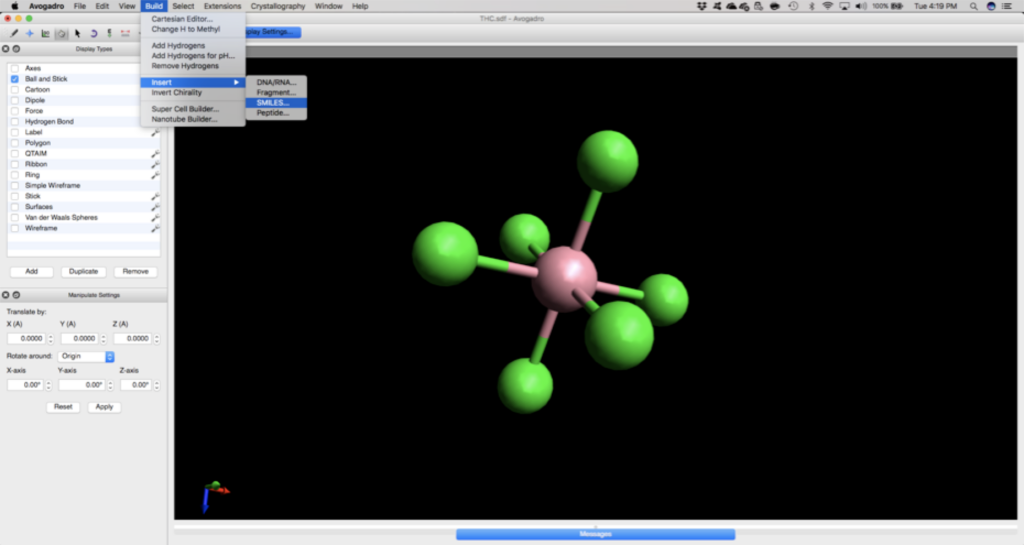
You can import this into Avogadro, which is available in the Chemistry Learning Commons and Chemistry Virtual Computer Lab using the BUILD > INSERT > SMILES option:
3D image of cobalt hexachloride in Avogadro.
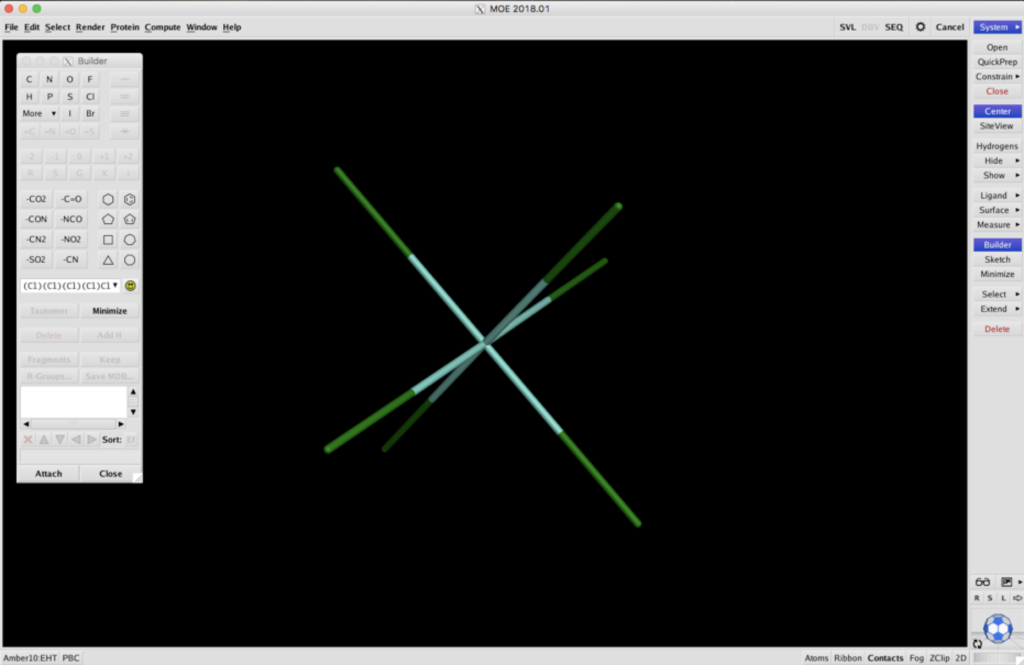
Using MOE 2020, available in the computer modeling laboratory or on the NMR data processing workstations, you can import the SMILES code in the builder menu. Simply copy the SMILES code into the space about halfway down the builder menu, and click the little smiley face right next to it.
3D image of cobalt hexachloride in MOE.
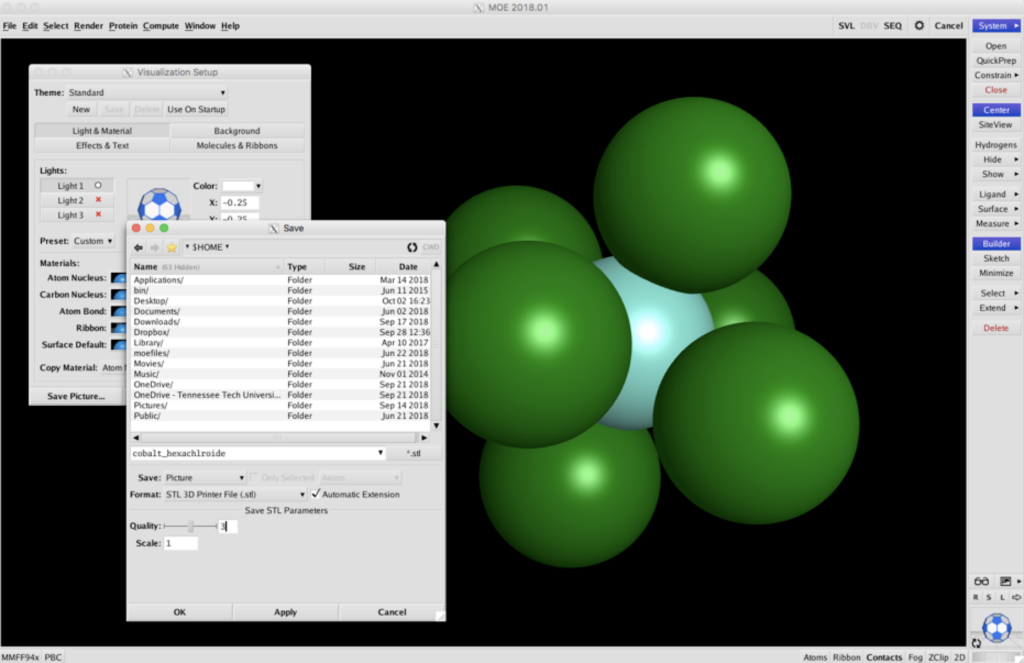
If you are interested in printing this molecule using a 3D printer, first, select all of the atoms with your mouse, right-click and select ATOMS. Then select the space-filling option. If you try and print the wireframe model pictured above, the 3D printer will not result in a stable model and the polymer will fall apart easily. Next, select the RENDER > SETUP menu and click SAVE PICTURE. Change the Format to STL 3D PRINTER FILE, and change the quality to 3 (this goes up to six, but if you go all the way to 6, you’ll get a really large file; 3 is generally good enough). Press OK and your STL file will generate. The STL file can then be opened using the software that interfaces with your 3D printer and scaled using that software for size.
Generating a STL file if cobalt hexachloride for a 3D printer in MOE.
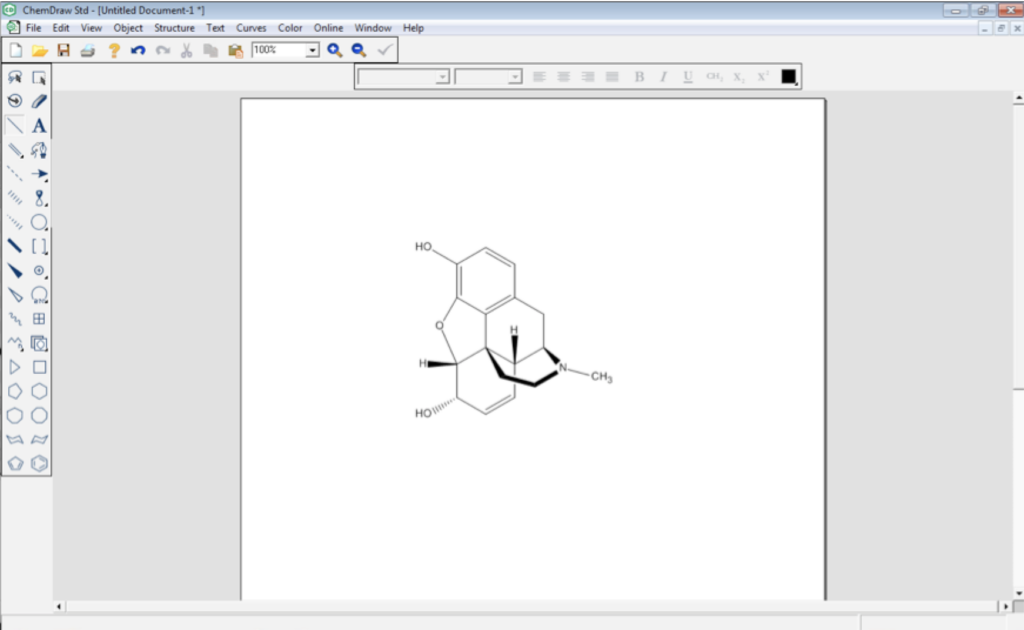
Larger and more complicated files can also be represented using SMILES strings. Consider a molecule which might make a lot of people “happy” – morphine. Sketch this in ChemDraw, and be sure to use wedges and dashes to represent stereochemistry.
Sketch of morphine in ChemDraw.
Generate the SMILES code by putting a box around the whole molecule and right-clicking on the box to go to MOLECULE > COPY AS > SMILES:
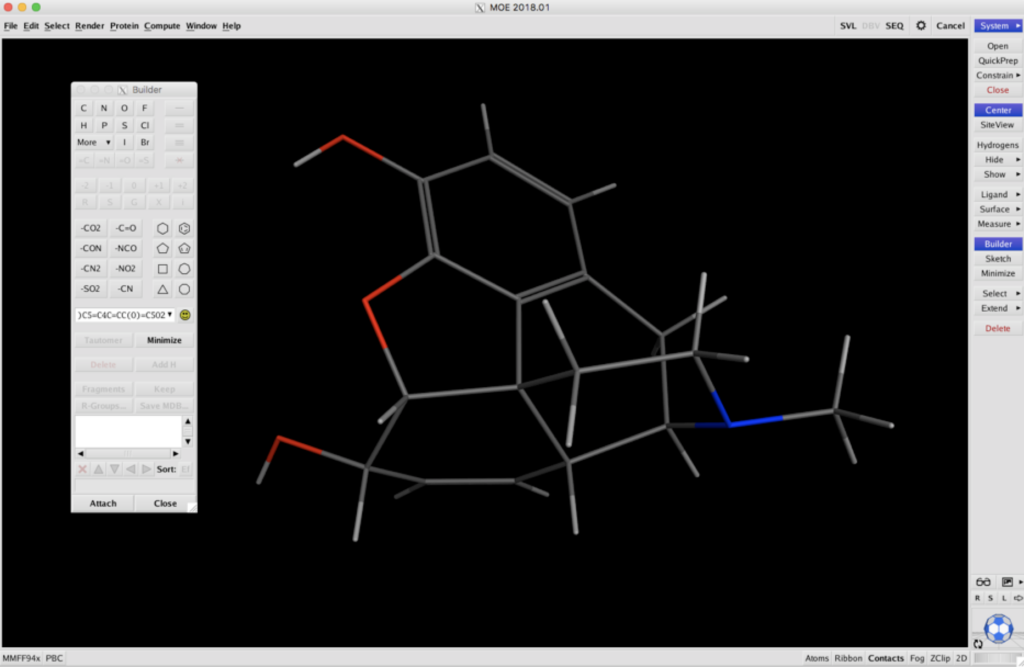
Now, copy the SMILES code into the BUILDER in MOE 2020, press the little smiley face icon, and the 3D structure of morphine is now modeled in MOE 2020. Note also that the stereochemistry about the chiral carbons is also correct (assuming you sketched it properly in ChemDraw, so this is a bit easier than building morphine from scratch in MOE 2020 and painstakingly moving atoms around and re-minimizing to make sure you get the stereochemistry correct.
3D image of morphine in MOE.
As an additional note, while you can sketch any molecule’s 2D structure in ChemDraw and export it to a 3D representation using SMILES, many molecules have 3D structures and SMILES strings available in the PubChem database online.
Hydrogen peroxide (H2O2) naturally decomposes to produce oxygen and water. However, this process takes a very long time. It may be sped up by the addition of a catalyst. In this experiment, we will use the iodide ion (I–) present in potassium iodide or sodium iodide as a catalyst to speed up the decomposition of hydrogen peroxide. The reaction is also exothermic, meaning that it releases heat.
The catalyzed reactions are shown below:
H2O2 (aq) + I–(aq) –> H2O(l) + IO–(aq)
IO–(aq) + H2O2 (aq) –> H2O(l) + O2 (g)
The overall reaction is as follows:
2 H2O2 (aq) –> 2 H2O(l) + O2 (g)
Materials
30% Hydrogen Peroxide (H2O2)
Potassium iodide or Sodium iodide
Food Coloring
Liquid dish detergent (Palmolive)
1 Liter Graduated Cylinder
A large basin or tarp to facilitate cleanup
glowing splint (optional)
Procedure
Place the 1 Liter graduated cylinder in the center of the large basin or tarp.
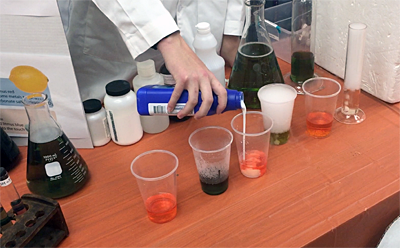
Pour 50 mL of 30% hydrogen peroxide into the graduated cylinder. Add two to four drops of food coloring. Add a small layer of liquid dish detergent to the mixture.
Prepare a saturated solution of potassium iodide or sodium iodide by adding an excess of salt to deionized water. The supernate of these solutions is used to carry out the reaction.
Swirl the contents of the cylinder and quickly add 5 mL of saturated potassium iodide solution before the agitation has subsided. This reaction occurs rapidly, so stand back immediately after adding the potassium or sodium iodide solution.
The reaction produces water and oxygen gas. The oxygen gas is trapped in the foam bubbles of the soap solution. To test for the presence of oxygen, you can introduce a glowing splint to the graduated cylinder.
Safety
This experiment utilizes 30% hydrogen peroxide, which is a strong oxidizing agent (household hydrogen peroxide is typically about 3%). Concentrated hydrogen peroxide can cause burns. Wear latex gloves, safety glasses, and avoid contact with the skin and mucous membranes.
A safer version of this demonstration that utilizes 3% (household) hydrogen peroxide instead of 30% hyrogen peroxide is also available. See reference #2 below.
Disposal of Waste Products
All waste products may be safely disposed of down the drain upon addition of plenty of water.
This experiment demonstrates the basic concepts of what acids and bases are, and introduces participants to the pH scale and how a chemical can be identified as acidic, basic or neutral using a simple, colorimetric qualitative test (e.g. no pH meter is required).
An acid is defined according to Brönsted theory as a proton (H+) donor, and a base is defined as a proton acceptor. The pH of a substance is a method of measuring the acidity or alkalinity of a chemical substance. The pH is defined as the negative log of the H+ concentration:
pH = – log [H+]
The pH scale goes from zero to 14. A pH of 7 is neutral (neither acidic nor basic. Pure water has a pH of 7. Acids have a pH lower than 7, and bases have a pH higher than 7. The further a chemical’s pH is from 7, the stronger the acid or base.
In this demonstration, we will estimate the pH qualitatively using universal indicator. When added to a chemical substance, an acid will turn red, yellow or orange, and a base will turn blue or purple. A neutral chemical will be green. This experiment will test the pH of several common household chemicals, as well as using dry ice, hydrochloric acid (HCl) and sodium hydroxide (NaOH) to observe the color change in a solution.
Materials
Test Tubes
Erlenmeyer Flasks or small plastic cups
1 Liter Glass Cylinder (does not have to be graduated)
Citric Acid
Dish Detergent (Palmolive)
Dry Ice
0.1 M Hydrochloric Acid (HCl)
Milk of Magnesia (or Alka-Seltzer)
Old Rag
Sodium Bicarbonate (Baking Soda)
0.1 M Sodium Hydroxide (NaOH)
Tarp or Plastic Sheet (for easy cleanup)
Universal Indicator (Fischer Scientific)
Deionized Water
Procedure
Cover the table where you plan to conduct the demonstration with a tarp or plastic sheet.
Prior to beginning the demonstration, fill the 1 L glass cylinder approximately 3/4 full with deionized water. Add a couple of drops of universal indicator until the solution turns a nice, dark green color. Add approximately three tablespoons of baking soda (sodium bicarbonate) to the mixture to sufficiently buffer the solution. Right before the demonstration begins, add 2-3 chips of dry ice to the water to initiate the water/carbon dioxide reaction. As long as you have added enough sodium bicarbonate, the solution will remain green. Throughout the demonstration, you can continue to add dry ice and explain that:H2 + CO2 –> H2CO3 (an acid)
Start with three plastic cups. Add a few crystals of citric acid to one, a few crystals of sodium bicarbonate to the second cup, and nothing to the third cup. Pour deionized water into each cup and add a few drops of universal indicator. The first cup will turn red, the second cup will turn purple and the third cup will turn green. Explain what this means in terms of pH.
Take a large Erlenmeyer flask and fill 1/2 full with deionized water. Add a few drops of universal indicator until this turns green. Add enough 0.1 M NaOH until the solution turns purple. Then, add acid and observe the color change from purple to blue to green to orange to yellow and finally red. You may either add dry ice to this, which will react with the water to acidify the solution with carbonic acid, or add 0.1 M HCl in slow increments.At some point while the color is changing, throw another chip of dry ice in your large, buffered cylinder of water and ask why the color is still green.
Another fun activity that small children love is to make CO2 bubbles. You can do this by making a water and soap (dish detergent) mixture and dipping an old rag into it so that it is nice and soapy. Run a thin part of this soapy rag across the top of the large 1 liter cylinder that has dry ice bubbling in it. A bubble will be formed that is filled with white smoke. The white smoke is carbon dioxide. The CO2 in the dry ice is subliming (converting directly from solid to gas), which bubbles up through the water and is captured into the bubble (or escapes if there is no soap film). Of course, some of the CO2 reacts with the water to form carbonic acid, but not all of it.Small children will be very excited about the bubble forming and want to try and touch it or capture it. If their hands are soapy, they may be able to hold it, but if their hands are dry, the bubble will burst. Be extra observant and exercise caution as small children try and touch the bubble to insure that they do not knock over any glassware or the large cylinder on the table.
Safety
This experiment uses low concentrations of HCl and NaOH. Eye protection and latex gloves should be worn when working with acids and bases. It would be a good idea to have a few extra pairs of safety glasses available for participants to be more involved in mixing the acids and bases together.
Disposal of Waste Products
Most ingredients used in this demonstration are safely disposed of down the drain. HCl should be mixed with NaOH to produce salt water prior to flushing down the drain.
Video
Watch Ms. Janet Coonce and Luke Parrish demonstrate acids and bases in this video (2013).