Introduction
This experiment demonstrates the basic concepts of what acids and bases are, and introduces participants to the pH scale and how a chemical can be identified as acidic, basic or neutral using a simple, colorimetric qualitative test (e.g. no pH meter is required).
An acid is defined according to Brönsted theory as a proton (H+) donor, and a base is defined as a proton acceptor. The pH of a substance is a method of measuring the acidity or alkalinity of a chemical substance. The pH is defined as the negative log of the H+ concentration:
pH = – log [H+]
The pH scale goes from zero to 14. A pH of 7 is neutral (neither acidic nor basic. Pure water has a pH of 7. Acids have a pH lower than 7, and bases have a pH higher than 7. The further a chemical’s pH is from 7, the stronger the acid or base.
In this demonstration, we will estimate the pH qualitatively using universal indicator. When added to a chemical substance, an acid will turn red, yellow or orange, and a base will turn blue or purple. A neutral chemical will be green. This experiment will test the pH of several common household chemicals, as well as using dry ice, hydrochloric acid (HCl) and sodium hydroxide (NaOH) to observe the color change in a solution.
Materials
- Test Tubes
- Erlenmeyer Flasks or small plastic cups
- 1 Liter Glass Cylinder (does not have to be graduated)
- Citric Acid
- Dish Detergent (Palmolive)
- Dry Ice
- 0.1 M Hydrochloric Acid (HCl)
- Milk of Magnesia (or Alka-Seltzer)
- Old Rag
- Sodium Bicarbonate (Baking Soda)
- 0.1 M Sodium Hydroxide (NaOH)
- Tarp or Plastic Sheet (for easy cleanup)
- Universal Indicator (Fischer Scientific)
- Deionized Water
Procedure
- Cover the table where you plan to conduct the demonstration with a tarp or plastic sheet.
- Prior to beginning the demonstration, fill the 1 L glass cylinder approximately 3/4 full with deionized water. Add a couple of drops of universal indicator until the solution turns a nice, dark green color. Add approximately three tablespoons of baking soda (sodium bicarbonate) to the mixture to sufficiently buffer the solution. Right before the demonstration begins, add 2-3 chips of dry ice to the water to initiate the water/carbon dioxide reaction. As long as you have added enough sodium bicarbonate, the solution will remain green. Throughout the demonstration, you can continue to add dry ice and explain that:H2 + CO2 –> H2CO3 (an acid)
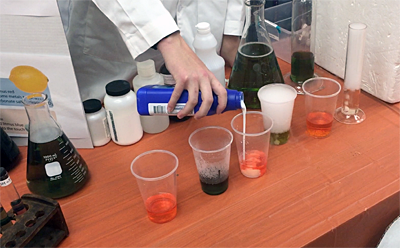
- Start with three plastic cups. Add a few crystals of citric acid to one, a few crystals of sodium bicarbonate to the second cup, and nothing to the third cup. Pour deionized water into each cup and add a few drops of universal indicator. The first cup will turn red, the second cup will turn purple and the third cup will turn green. Explain what this means in terms of pH.
- Take a large Erlenmeyer flask and fill 1/2 full with deionized water. Add a few drops of universal indicator until this turns green. Add enough 0.1 M NaOH until the solution turns purple. Then, add acid and observe the color change from purple to blue to green to orange to yellow and finally red. You may either add dry ice to this, which will react with the water to acidify the solution with carbonic acid, or add 0.1 M HCl in slow increments.At some point while the color is changing, throw another chip of dry ice in your large, buffered cylinder of water and ask why the color is still green.
- Another fun activity that small children love is to make CO2 bubbles. You can do this by making a water and soap (dish detergent) mixture and dipping an old rag into it so that it is nice and soapy. Run a thin part of this soapy rag across the top of the large 1 liter cylinder that has dry ice bubbling in it. A bubble will be formed that is filled with white smoke. The white smoke is carbon dioxide. The CO2 in the dry ice is subliming (converting directly from solid to gas), which bubbles up through the water and is captured into the bubble (or escapes if there is no soap film). Of course, some of the CO2 reacts with the water to form carbonic acid, but not all of it.Small children will be very excited about the bubble forming and want to try and touch it or capture it. If their hands are soapy, they may be able to hold it, but if their hands are dry, the bubble will burst. Be extra observant and exercise caution as small children try and touch the bubble to insure that they do not knock over any glassware or the large cylinder on the table.
Safety
This experiment uses low concentrations of HCl and NaOH. Eye protection and latex gloves should be worn when working with acids and bases. It would be a good idea to have a few extra pairs of safety glasses available for participants to be more involved in mixing the acids and bases together.
Disposal of Waste Products
Most ingredients used in this demonstration are safely disposed of down the drain. HCl should be mixed with NaOH to produce salt water prior to flushing down the drain.
Video
Watch Ms. Janet Coonce and Luke Parrish demonstrate acids and bases in this video (2013).